Selling on your site
Your sites can sell to visitors — products, bookings, access, donations — using your own payment accounts. The platform never holds your money: payments go straight to the gateway account you connect.
Connect a payment gateway
- Open your site and click Payments.
- Choose one or more gateways (for example Stripe, PayPal, or Chip) and enter your account credentials in each gateway's card.
- Tick Enable for the gateways you want to offer.
- Set a Default gateway — used when the visitor does not pick one.
- Save.
Secrets are encrypted and never shown again after saving — you will only see a "saved" indicator. Payments settle directly into your gateway account.
Registering a payment gateway account
Each gateway needs its own merchant account in your name — the platform never creates or holds these accounts for you. If you do not have one yet, sign up directly with the provider:
- Stripe — Create a Stripe account for card and wallet payments.
- Chip — Register with CHIP for Malaysian (MYR) payments.
- PayPal — Open a PayPal business account for PayPal Checkout.
Once the account is approved, copy its API credentials from the provider's dashboard and paste them into that gateway's card back on this Payments page. Tick Enable afterwards to offer it to visitors.
Getting CHIP API Key & Brand ID
- Log in to your CHIP account.
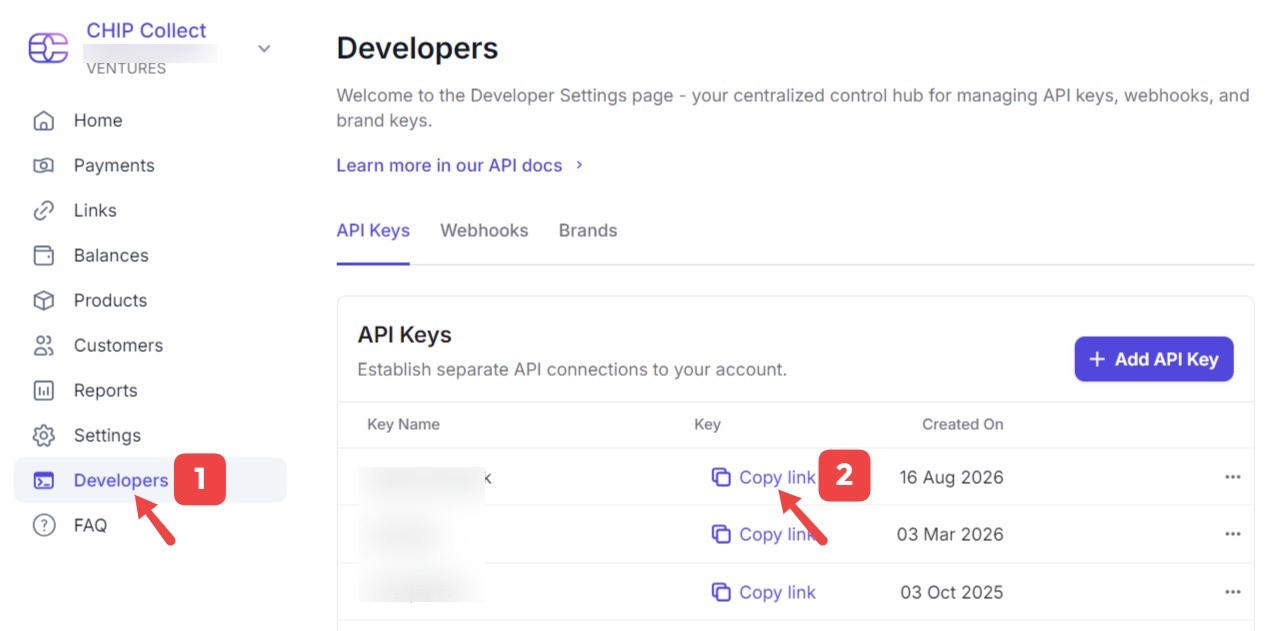
- Go to the Developers menu.
- On the API Keys tab, click the Copy button to get the API Key.
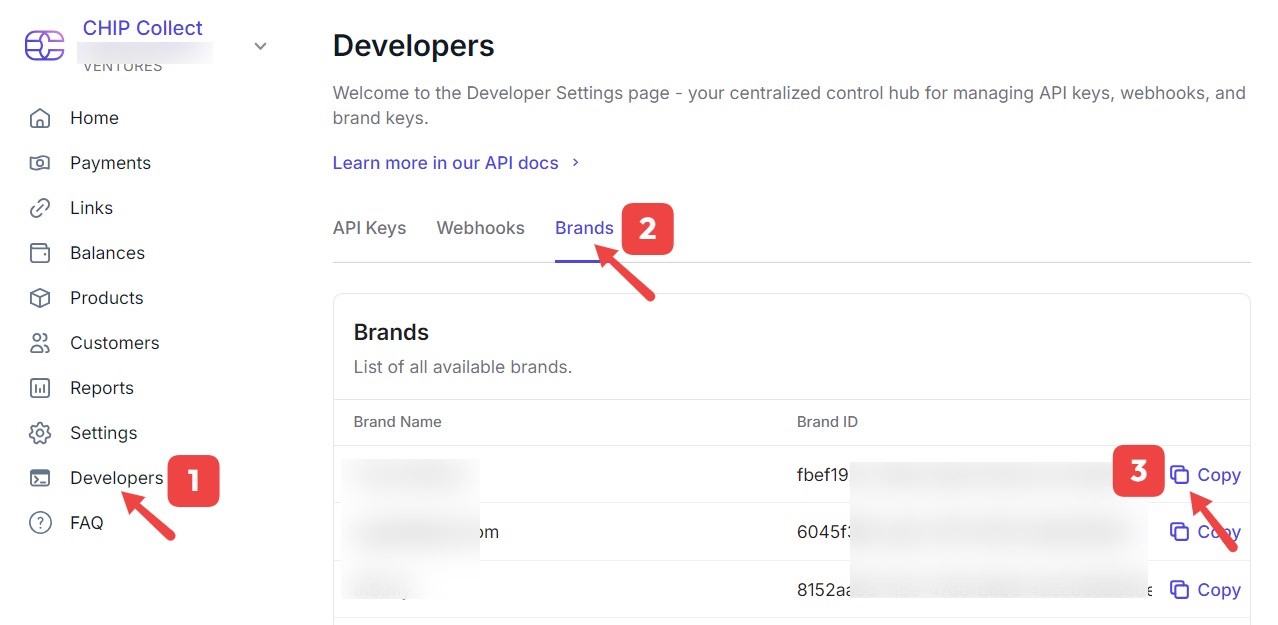
- Go to the Brands tab on the Developers page.
- Click the Copy button to copy the Brand ID.
Choose your currency
Pick the site's currency from the Currency dropdown. Sites that have never sold anything inherit the platform default until you set one.
Important: the currency is locked permanently once the site has its first paid order — this keeps your order book consistent. Choose carefully before you start selling.
Some gateways only support certain currencies; unsupported gateways are hidden from checkout automatically.
Set up products and orders
Selling works through your site's collections:
- Create a Products collection and add each product as a record (with a price field).
- Create an Orders collection — every purchase is recorded here.
- On the Payments page, point the site at these collections.
Your AI assistant can do all of this for you, and build the checkout page too — just ask it to "set up a shop on this site". The AI configures the wiring but cannot see or change your gateway secrets.
Extra options
- Custom amount — allow visitors to pay any amount (donations, pay-what-you-want).
- Success page — visitors land here after paying.
Sell a membership (access_days)
A product record can grant the buyer the member role when paid. Add a field
named access_days to the product (a whole number) to give a time-limited
membership: after paying, the buyer becomes a member and their access expires
that many days later. Leave access_days out for a permanent membership.
- Only logged-in visitors can buy a membership product (a guest is asked to log in first).
- The role upgrade never touches admins and only promotes
visitor → member. - An expired member automatically loses access to members-only pages and
collections. To downgrade expired members on a schedule, point an external
scheduler at your site's signed
expire_entitlementstask (see the site's Scheduled tasks card), or ask your AI assistant to run it.
Your AI assistant can configure this too — ask it to "make this product grant a 30-day membership".
Coupons (discount codes)
You can offer coupon codes that visitors enter at checkout. Coupons live in your site's collections — manage them with your AI assistant or the Records dashboard; no extra app needed.
-
Create a Coupons collection (set access to
admin/adminso codes are not publicly listable) and a Coupon redemptions collection (alsoadmin/admin) — each coupon use is recorded there. -
Add a coupon record with these fields:
Field Meaning codeThe code visitors type (case-insensitive, e.g. WELCOME10)discount_typefixed(an amount in your site currency, e.g. 10 = 10 off) orpercent(1–100)discount_valueThe discount amount activeTurn coupons on/off without deleting them expires_atOptional expiry date max_redemptionsOptional total usage cap per_customer_limitUses per customer; leave out = 1, set 0= unlimited per customer -
On the Payments page, point Coupons collection and Coupon redemptions collection at them (or ask your AI assistant to do it).
The server validates the code (active, not expired, within limits) and deducts the discount from the real price — discounts are never trusted from the browser. When a coupon covers the full amount, the order completes free (no payment needed) and any entitlements still activate.
Offline payment (manual QR / bank transfer / pay-later)
Sell without a payment gateway: visitors place the order, then pay you manually.
- On the Payments page, tick Enable offline payments.
- Fill in Payment instructions (bank account, DuitNow QR note, "send the receipt to WhatsApp …") and optionally a QR image URL (upload your QR to the media library and paste its URL).
Offline orders appear in your Orders collection with status pending. Once
you receive the money, confirm the order from your site's admin page (your AI
assistant can build one for you — an admin page with a "Confirm payment
received" button). Confirming marks the order paid and activates any
entitlements. Visitors keep seeing "pending" until you confirm.
Testing your shop
Publish your site, open the shop page, and place a small test order. You should
see the order appear in your Orders collection with status paid once the
payment completes. Also test a coupon: enter a valid code and check the
discounted total, then a code covered 100% (the order should complete free),
and an offline order (it stays pending until you confirm it).
* May require additional fees — check your dashboard for the current pricing.